Showing posts with label apothecary accents. Show all posts

Friday, 1 May 2015

Shabby chic card class (tutorial)

We had a great time at my class last night, making these three vintage, shabby chic cards. It was a fast paced and fun evening, working with the lovely Everything Eleanor stamp set and a variety of punches and dies.

 
Bye bye Pistachio Pudding ink & Apothecary Accents Framelits. Missing you already *sniffle*.


I used some old book pages with these two cards, to give a bit of contrast to the pastel colours. I used pages from Business French for Beginners and Adventure Stories for Girls (edited by the intriguingly named "Leonard Gribble". He sounds like he should have been writing taxation manuals rather than ripping yarns for wizard "gells", but a chap's got to make a living somehow, I suppose).


This one has a tie closure - I glued the ribbon to the card behind the central medallion, so the glue didn't show through.
 

If you want to have a go, I've attached the instructions for making the cards here. Some of the elements I used are retiring in the next few weeks, but you can always substitute similar items. (I think you can still grab the Delicate Design embossing folders if you're quick.)

Here's what I used (current stock only)


Built for Free Using: My Stampin Blog


Tuesday, 28 April 2015

Wedding gift bag

 
Here we have what I am romantically naming the Wedding Gift Pouch. For when the lovebirds have asked you to mark their special day with the cold hard gift of cash.(And why not? They've probably lived together for ages & have all the stuff they need anyway, so why risk being gifted a cheese grater shaped like a fish? These things should not be left to chance!)
 
The pouch itself is made using the Mini Treat Bag thinlits die & I overstamped it with the big Something Lacy stamp which I'd patchily applied Sahara Sand ink to, (I stamped off onto scrap before stamping on the bag so it was really faded).


I machine stitched the swirly whirly lines onto the card for an elegant yet shabby, distressed look. The labels are made with the Apothecary Accents framelits die set, which was on the retired list & I think has now sold out. I'm not getting rid of it though. You'll have to prize it out of my cold dead hand, I love it so much.
 

I am really pleased with how this turned out, hope you like it too! You can still buy most of the things I used to make it in my Stampin' Up! store. Check out the bargains on the retired list and in the clearance section too.

Built for Free Using: My Stampin Blog


Saturday, 18 April 2015

Busy busy busy


I have finally accepted that, since they are now 10 & 14, it is unlikely that I will ever use my sewing machine to sew that darling little range of velveteen sailor suits for my boys. I've held off using it for papercrafting, afraid that I might damage it by sewing onto card, but it seems that as long as you don't put glue where you intend sewing, all should be fine.  

So, since I might as well get some use out of it, for the past few days I've been experimenting with machine sewing onto cards. My sewing is  still as bad as it has ever been, but on a card I can pass wonkiness off as, ahem,  "shabby chic".


I made this card using up old scraps I would have thrown away. It's a bit busy, but that's ok. I like a lot going on on a card :)

Here's what I used:

Built for Free Using: My Stampin Blog


Friday, 13 February 2015

Pop up Valentine's card


Valentine's Day tomorrow.  I was going to give Mr B the card I made as a sample for my Valentine's card classes. To some, this will seem cheap. However, thrift is a quality my husband finds strangely arousing in a woman, so I was onto a winner! But I smudged ink on it & it couldn't be saved. So I made this one instead. Hearts, flying at your face from all angles! 
 

To get the fancy edge I took the large Framelit from the Apothecary Accents set, placed it against each edge of the card & just ran it partly through the Big Shot, so that it only cut half the die.


The I heart U stamp is from the Pictogram Punches set - I forgot to add that in the links below.

Have a fun & smoochy Valentines Day, whatever you get up to. And if it should turn into a washout - if he's sat there picking his feet & watching Match of the Day instead of gazing lovingly into your eyes - why not console yourself with a spot of craft shopping? Click on any of the pictures below to hop through into my shop. And remember, there's free product to be picked from the Sale-a-Bration catalogue if your order tops £45.


Built for Free Using: My Stampin Blog


Sunday, 8 February 2015

Wedding card


We're all romantic & spoony this week at Rubberdubber towers. It's Valentine's Day next week & yesterday was me & Mr B's 27th date-a-versary, an event we still celebrate, even though we've been married umpteen years. 

27 years ago last night we went to Aberystwyth Arts Centre to watch the sort of pretentious foreign film we'd hoot with laughter at these days, before earnestly deconstructing it in the union bar.

Mr B considers it a master stroke that he asked me out just before Valentine's Day, as each year he's able to pick up a modest bunch of flowers at a "sensible" price & they're still in bloom a week later, thus allowing him to avoid buying a Valentine's bouquet at "silly" prices. 

"Well, it's hardly worth it. These have got another few days left in them yet", he'll say, deadheading a carnation.

Anyway, pondering on the fairytale that is married life inspired me to make this card using the new For the New Two and Something Lacy stamp sets.


I got that white border effect totally by accident. First I stamped the pink background from the Everything Eleanor stamp set onto white cardstock. I stamped another onto card & cut it out to make a mask, which I placed back over the stamped image, so that I could over stamp the lace background. The card was quite thick, and so when I over stamped the lace stamp, it couldn't make contact properly with the card at the edge of the mask, & it left a wider border than I was expecting. I really like it though, & will try that effect with other stamps & masks. The trick is to use card to mask off & not paper. 


The Apothecary Accents Framelit matches the larger background stamp perfectly, & I cut a second one in glitter paper, cut it in 2 & popped it behind so it was just slightly peeping out. Too much would have looked cheap but just a hint of sparkle really lifts the card.

Here's what I used (all stamps listed below are cling mount - wood mount are also available)


Built for Free Using: My Stampin Blog


Thursday, 5 February 2015

Beautiful boxes

 
I love the gift box punch board. It turns any reasonable size piece of thick paper or card into packaging in seconds. The big boxes could fit a Yankee style candle jar, while the smallest size is great for wedding or party favours.
 

And then the fun begins deciding how to decorate. For this one I made the paper lace using the Stampin' Up! Edgelit die. The bow on the left is the Bow Builder Punch & the flowers are the Spiral Flower Die.

I'll be running a class on boxes in a couple of months - check back here or my facebook page for more information.


Friday, 26 September 2014

Pop up White Christmas


Love me my pop up cards & the White Christmas stamp set is perfect for creating little scenes.

I used the house from the Life's Adventures stamp set, which is a hostess set, but this card would work equally well with the Holiday Home stamp set in the Autumn/Winter catalogue. I've put details of both below. (Incidentally, the Apothecary Accents Framelits & coordinating paper piercing template I used on the sentiment are both on sale in this weeks Weekly Deals!)

I made the starry sky using a clear emboss resist technique. I pressed the Versamark ink pad through the the star mask  then embossed with clear embossing powder. Then I sponged Pacific Point ink over the top, & gave the card a quick swipe with a baby wipe to remove the ink from the stars.

With practice, pop up cards are pretty easy. You just need to get a feel for where to make the cuts at the back of your card & how different length cuts  create perspective.

Here, my white base card measures 4 1/2"  (11.5cm) wide, & the cuts are at 1 5/8" & 2 6/8" (4.2 cm & 7.2cm). I put a stepped cut into the second cut, to pop the car in front of the tree.


Sunday, 27 July 2014

Decorative star mask bokeh (video)

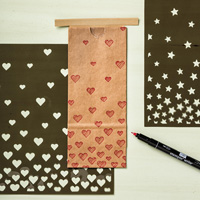
I've been messing around with masks today. At £2.75 for the two, the Hearts & Stars decorative masks are a bargain.


I accidentally stumbled on an effect similar to bokeh, in photography. Bokeh is "...the aesthetic quality of the blur produced in the out-of-focus parts of an image produced by a lens". Of course it is.

If you know your way around a camera you can create the effect yourself. Since I take most of my photos on my iPhone, I just use an app, Bokehful, to add the effect in later. I've used it round the edges of the photo above.

You create the effect by applying ink lightly through the mask, then going back in in certain areas with a heavy application. I used Real Red, Crisp Cantaloupe and Bermuda Bay. 


It's quick, & makes a really pretty background for a card.

Stand by for an instructional video:


Items featured: