Showing posts with label gift bag punch board. Show all posts

Tuesday, 13 October 2015

Halloween Milk Carton Box


Halloween is nearly here and I hope you've be enjoying the projects I've been sharing. I've loved working with Stampin' Up's Halloween range this year, especially the Witches' Night stamp set (I know! I've kept so quiet about it too!).

This is my little Halloween Milk Carton Box and I love it! I'm especially proud of the nod to the Amityville Horror in the dear little Dutch gable above the door.

Yeah... That probably sounded a *bit* weird.

 
I've decorated it using the Happy Hauntings Designer Series Paper pack. It's full of fun little Halloween patterns that aren't too in-your-face. And of course the Spider Web Doily had to put in another appearance! I've doubled it over the closed top of the box and held it in place with a mini peg (covered by the stamped crows), so it's removeable.

And that's important because...


The box is top opening, so you can drop treats in! At around 2.5" x 2.5" x 3.5", it's big enough to hold something substantial - maybe even a cupcake?


I used the Gift Bag Punch Board to make this basic milk carton box shape 


Yup! You can use the Gift Bag Punch Board to make milk carton boxes and I have a video tutorial showing you how to make the basic box, above, here. (I've also uploaded tutorials for making lidded milk carton boxes too - have a poke round my blog).


I made the roof tiles using the scalloped die from the Cutie Pie Thinlits die set. I used it upside down to cut pointy edges & layered them up. You can get the same effect using scalloped scissors.

For the door, I punched some Black Glimmer Paper using the Note Tag punch, and also punched out a couple in orange paper & used them behind it, to frame it. The Dutch gable is a section of the Trick or Treat stamp from the Witches' Night stamp set (that's where the crows on the peg come from too). Just make sure you glue it by its bottom edges to the top front edge of the box and not the edges of the "roof", so that the box can open without tearing it.

I made the windows by punching small squares of the spider patterned paper and sticking them together with a gap, to look like a frame. The window ledge is an offcut from the treat bag I made the other day (see? Never throw anything away!!).


Then I layered some spider web doilies on the walls of the house to give it some more texture and interest.

My favourite little finishing touch is the wee ghosty in the attic - he peers mournfully out from under the eaves at the back of the box. He's cut out from a piece of the patterned paper too, and popped up on Stampin' Dimensionals.


Hope you like it & have a go at making one yourself. Let me see what you make if you do!

You can buy the elements I used from my Stampin' Up! shop & it would be ace if you did :)


Built for Free Using: My Stampin Blog

Thursday, 18 June 2015

Lidded milk carton box tutorial - part 2 (video)


Here's the final part of my milk carton box tutorial using the gift bag punch board - decorating the box.
 
No, I don't know why my voice cuts in over the intro either!
 
 
Hope you have a go at this, it's a great use of the punch board :)
 

Built for Free Using: My Stampin Blog


Tuesday, 16 June 2015

Lidded milk carton box tutorial - part 1


Yesterday I shared a sneak peek of some lidded boxes I made with the new Gift Bag Punch Board. 


Today's video shows you how to make the box, using a single sheet of A4 card stock (you can substitute 11inch wide card if you wish). Enjoy!


Built for Free Using: My Stampin Blog


Monday, 15 June 2015

Lidded milk carton box tutorial (video)


A few weeks ago I did a tutorial on how to use the gift bag punch board to make a milk carton style box. I've tweaked it a bit & now you can make a lidded milk carton box like these! I'll link the full video tomorrow. Meanwhile, here's an overview

Saturday, 6 June 2015

Sunburst gift bag

 
Today's make features Stampin' Up!'s new Gift Bag Punch Board. I made this bag quickly using a sheet of A4 Whisper White cardstock. I stamped the sunburst from Kinda Eclectic and layered up a couple of punched pieces in coordinating colours of Cucumber Crush and Watermelon Wonder.
 
Quick, easy, practical & stylish :)


Built for Free Using: My Stampin Blog


Wednesday, 3 June 2015

Extra small gift bag with the Gift Bag Punch Board

use 6x6 papers to make extra small gift bags

If you want to use Stampin' Up!'s new Gift Bag Punch Board to make gift bags out of its new 6x6" papers, the instructions on the board would have you believe that you can't. The smallest piece of paper it gives instructions for is 10" wide.

Well I wasn't having that, let me tell you!

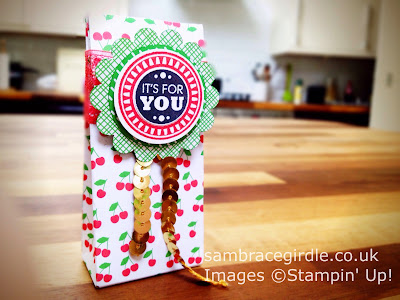
The Cherry on Top papers are ideal for diddy gift wrapping, and so after a dash of tweaking, a smidge of fiddling & only minimal swearing I've worked out how to make an extra small bag. It's ideal for gifting a scented tea light, jelly beans, a lolly pop or anything else that measures roughly  1" by 1.5" by 2".

To make it, you pretty much follow the instructions supplied with the board - you just need to have the edge of the paper in a slightly different place at different times.

Here's a video that shows you how:


And here's the order in which you need to punch and score :

  1. Take a piece of paper 6x6".
  2. Line up the left edge of the paper on the start line & punch.
  3. Score horizontal line.
  4. Line up left edge of the paper with the triangle side score line (the sticky out triangle bit) & score on the S vertical line.
  5. Line up the score line created in 4. with the start line & punch.
  6. Line up the score line created in 4. with the triangle side score line & score on the 2nd vertical "side" line (the one before the S line).
  7. Line up the score line created in 6. with the start line & punch.
  8. Position the paper so that the triangle side score line on the board is mid way between the 1st & 2nd vertical score lines & score down to create the gusset.
  9. Line up the 3rd vertical score line with the triangle side score line & score on the S vertical line & horizontally.
  10. Line up the score line created in 9. with the start line & punch.
  11. Line up the score line created in 9. with the triangle side score line & score on the 2nd vertical "side" line.
  12. Line up the score line created in 11. with the start line & punch.
  13. Position the paper so that the triangle side score line on the board is mid way between the 4th & 5th vertical score lines & score down to create the gusset.


Monday, 1 June 2015

Milk carton style box with the gift bag punch board (video)

 
Wheeeeeeee! the new catalogue launches tomorrow and one of Stampin' Up!'s new releases is the Gift Bag Punch Board (#135862), which makes tall gift bags in a variety of sizes. But with minimal tweaking and just a smidge of swearing, you can also create darling little milk carton style boxes with them.
 
This box uses a 6 1/8" x 11 3/4" piece of cardstock (basically, an A4 sheet trimmed along the shorter edge).
 
It makes a box that is roughly 2 3/4 x 2 3/4 x 2 1/2" (excluding the "roof space"). It's slightly smaller than the box created by the Bakers Box Thinlits in the new catalogue (#138279), but the Gift Bag Punch Board is quite a bit cheaper and it does two things, so to my mind it's an easy choice between the two. It's still big enough to pop in a cupcake, or sweets or biscuits etc (not milk though!).
 
Here's a short video on how to make one:
 
 
I used papers from the Cherry On Top 6x6 paper stack (#138443) and the coordinating cardstock (#139013). The "surprise" stamp is from the Amazing Birthday stamp set (#134228).
 
 
The Gift Bag Punch Board and Cherry on Top papers are available to buy from 2 June 2015. You can buy them from my Stampin' Up shop : http://sambracegirdle.stampinup.net or click on Shop now in the side bar >>>