Monday 25 January 2016

Pop Up Valentine #2


Two Bloomin' Hearts pop-up Valentine cards in 2 days! It's an all out, Bloomin' Hearts, pop-up Valentine card frenzy!!

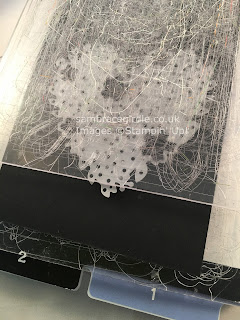
I made this card using the Bloomin Hearts thinlit dies and Bloomin' Love stamp set. I used pretty much the same principle as with yesterday's card - score your base card, position the heart die about .5" from the score line & don't completely cover it with the top cutting plate, so that the heart remains attached at the base point.


Flip the card over and repeat on the opposite side of the card. Lift up the two part cut hearts & glue them to each other at the top with a couple of glue dots. Decorate with a sentiment and cut a slightly larger backing card in black. Attach the black backing card & cut a couple more hearts in Real Red. Glue them into the gap left by the popped up hearts (cut off the very bottoms off where the popped up hearts are still attached). And you're done!


Here's what I used - click on anything to buy.
Built for Free Using: My Stampin Blog

Sunday 24 January 2016

Pop up Valentine #1


Here's a crisp and clean pop up Valentine card made with the new Bloomin' Love bundle - a die set and a coordinating set of stamps (buy as a bundle rather than individually & save 15%). The die reminded me of the lovely white laser cut cards you can buy so I thought I have a go at making my own.


I took a piece of Whisper White Thick card and folded it down the middle to make a 4 1/4" x 5 1/2" card. 


I positioned the floral heart die on it with the bottom point about half an inch from the score line. For running it through the Big Shot, I placed the top cutting pad so that it didn't cover the very bottom point of the heart. I really need to buy new cutting pads, don't I?


This is so that it doesn't cut that part out and the bottom remains attached to the base of the card & helps hold it in place - look carefully at the photo & you'll see.


Gently push the part cut heart up so that it's perpendicular to the opposite side of the card. Punch a piece of Whisper White with the Word Window punch (or cut a narrow strip about 1.5" x .25"). Crease at about .25" on each end & fold. Glue one end to the back of the large flower in the centre of the heart. Cut a thin slot in the base card, roughly behind where the flower will appear when popped up & feed the strip of card through & glue to the back.


This is what it should look like when secured. And that's the pop up stuff done - the rest is all decoration.


I glued a piece of Whisper White card behind the space where the white heart  had been cut from. Then I cut another heart in Real Red cardstock, flipped it over so that the reverse was upward, cut the very bottom point off (as that's where the white heart remains attached to the card) and glued it into the empty space. It will fit snugly, like a jigsaw piece. 


Then I stamped and die cut various elements from the stamp set and arranged them on the heart. The flower centres are cut from silver glimmer paper and I looped some silver thread at the back.

To back the card, I cut a piece of Real Red cardstock slightly larger than the card base and carefully stuck the card base inside with tape. 


I ran a peice of taffeta ribbon round the inside of the card and secured it on the outside with tape, then placed a stamped die cut over the join and finished with a hand tied taffeta bow.


I added a stamped die cut to the back of the card, to write a message. I've kept it small as I do not go in for sloppy smoochy kissy wissy messages. Me & Mr B have been together 28 years and so a brisk and efficient indication of general goodwill is all that is required. Otherwise he starts getting "ideas".

So that's how you can use the Bloomin' Hearts thinlit dies and Bloomin' Love stamps to make a pop up Valentine! I think it would also look really good as a wedding card, all in white. I'll have a go at that this week.

I'll have another pop up card using the Bloomin' Hearts die for you tomorrow, so do come back & check.

And if you want to make this yourself, here's what I used:


Built for Free Using: My Stampin Blog

Tuesday 19 January 2016

Vintage Valentine


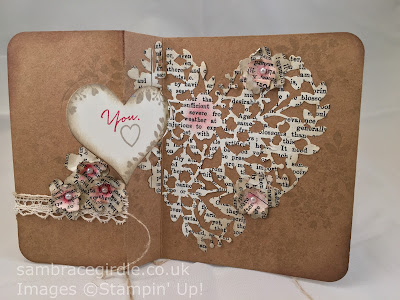
I love shabby chic so I was pleased to see the Bloomin' Hearts Thinlit dies in the Spring/Summer catalogue, as they work really well with this style. I used them here to cut the large text heart background and the small flowers on this Valentine card. What you maybe can't see at first glance is that it's a flip (or swing) card.


The card has a linen thread closure (glued under the crochet trim & flowers) and when opened, the heart flips round to reveal a simple, understated sentiment.

I used the coordinating Bloomin' Love stamp set to stamp flowers and leaves in Sahara Sand ink (2nd impression - stamp off onto scrap paper for the first) randomly on the card and on the edges of the cream heart (cut using the heart from the Treat Bag Thinlits dies, but any medium size heart shape die will do).


The sentiment in red ink is from a stamp set called What I Love (#141276), and it's a Sale-a-Bration set. This means it's free if you spend over £45. To give you an idea how this works, you could buy the Bloomin Love die and stamp bundle (£31.25),  the Venetian Crochet Trim (£6.50), Linen Thread (£4.25) and the Sahara Sand ink pad (£6). This would add up to £48 and you could then choose the What I Love Stamp set as your free Sale-a-Bration item. 


The "Know what I love?" stamp is actually all one line, but even at its widest point my heart die was too narrow to fit it all on. Since the stamp is photopolymer (clear) if you're feeling ruthless you could snip it in two, in the gap between the "what" and "I". I could never bring myself to do such a thing though, so to get it to span 2 lines I masked off "I love?" with washi tape and inked & stamped "Know what". Then I cleaned the stamp and masked off "Know what" and inked up "I love?" and stamped it underneath. 


To make the card I used Kraft cardstock and used the large Framelit from the Project Life Cards and Labels Framlits to cut a 4"x6" card base. I scored along the long length at 2" and at 2 3/4". Then I layed the heart die with the centre point over the first score line, and ran it part waay through a die cutting machine so that just the first and last part of the heart cut. You can see the principle in this card and you should be left with a card base that looks like this - ready to decorate! (The closed size of the card is 4"x4 1/2".)


 Here's what I used:


Built for Free Using: My Stampin Blog

Friday 15 January 2016

Valentine treat bag


Here's a little Valentine treat bag made using the Mini Treat Bag Thinlits and the new Bloomin' Heart Thinlits from the Spring/Summer catalogue. I think with a tweak to the sentiment this would be also be great for a wedding themed bag - maybe to hold gift vouchers, or even confetti.

The two little flowers are tiny dies which come with the main heart die, so it's great value for money. 

The Bloomin Hearts thinlits have a coordinating stamp set which I used to stamp the backing paper & the smaller heart. You can buy them both as a bundle (item no 140818) & save 15%. And remember that for every £45 you spend, you can pick a free item from the Sale-a-Bration brochure.

Here's what I used:
Built for Free Using: My Stampin Blog

Sunday 10 January 2016

New spring/summer catalogue


The new catalogue launched last week & it's got some lovely new stamps & papers.

The rose shown here is a 3-step stamp, from the Picture Perfect set. I stamped the first impression in Blushing Bride then the following 2 in Calypso Coral.


Friday 8 January 2016

New catalogue & freebies!


The new Spring/Summer catalogue launched this week. You can browse through it here


When you're deciding what to order, remember it's currently (until 31 March) Sale-A-Bration time. For every £45 you spend you can choose a free item from the Sale-A-Bration brochure. Chesck it out here