Showing posts with label amazing birthday. Show all posts

Wednesday, 3 June 2015

Extra small gift bag with the Gift Bag Punch Board

use 6x6 papers to make extra small gift bags

If you want to use Stampin' Up!'s new Gift Bag Punch Board to make gift bags out of its new 6x6" papers, the instructions on the board would have you believe that you can't. The smallest piece of paper it gives instructions for is 10" wide.

Well I wasn't having that, let me tell you!

The Cherry on Top papers are ideal for diddy gift wrapping, and so after a dash of tweaking, a smidge of fiddling & only minimal swearing I've worked out how to make an extra small bag. It's ideal for gifting a scented tea light, jelly beans, a lolly pop or anything else that measures roughly  1" by 1.5" by 2".

To make it, you pretty much follow the instructions supplied with the board - you just need to have the edge of the paper in a slightly different place at different times.

Here's a video that shows you how:


And here's the order in which you need to punch and score :

  1. Take a piece of paper 6x6".
  2. Line up the left edge of the paper on the start line & punch.
  3. Score horizontal line.
  4. Line up left edge of the paper with the triangle side score line (the sticky out triangle bit) & score on the S vertical line.
  5. Line up the score line created in 4. with the start line & punch.
  6. Line up the score line created in 4. with the triangle side score line & score on the 2nd vertical "side" line (the one before the S line).
  7. Line up the score line created in 6. with the start line & punch.
  8. Position the paper so that the triangle side score line on the board is mid way between the 1st & 2nd vertical score lines & score down to create the gusset.
  9. Line up the 3rd vertical score line with the triangle side score line & score on the S vertical line & horizontally.
  10. Line up the score line created in 9. with the start line & punch.
  11. Line up the score line created in 9. with the triangle side score line & score on the 2nd vertical "side" line.
  12. Line up the score line created in 11. with the start line & punch.
  13. Position the paper so that the triangle side score line on the board is mid way between the 4th & 5th vertical score lines & score down to create the gusset.


Monday, 1 June 2015

Milk carton style box with the gift bag punch board (video)

 
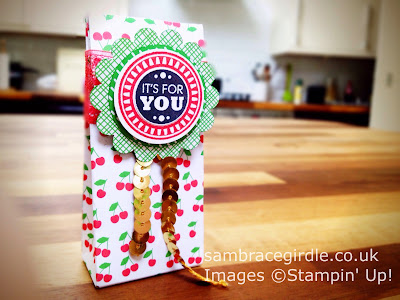
Wheeeeeeee! the new catalogue launches tomorrow and one of Stampin' Up!'s new releases is the Gift Bag Punch Board (#135862), which makes tall gift bags in a variety of sizes. But with minimal tweaking and just a smidge of swearing, you can also create darling little milk carton style boxes with them.
 
This box uses a 6 1/8" x 11 3/4" piece of cardstock (basically, an A4 sheet trimmed along the shorter edge).
 
It makes a box that is roughly 2 3/4 x 2 3/4 x 2 1/2" (excluding the "roof space"). It's slightly smaller than the box created by the Bakers Box Thinlits in the new catalogue (#138279), but the Gift Bag Punch Board is quite a bit cheaper and it does two things, so to my mind it's an easy choice between the two. It's still big enough to pop in a cupcake, or sweets or biscuits etc (not milk though!).
 
Here's a short video on how to make one:
 
 
I used papers from the Cherry On Top 6x6 paper stack (#138443) and the coordinating cardstock (#139013). The "surprise" stamp is from the Amazing Birthday stamp set (#134228).
 
 
The Gift Bag Punch Board and Cherry on Top papers are available to buy from 2 June 2015. You can buy them from my Stampin' Up shop : http://sambracegirdle.stampinup.net or click on Shop now in the side bar >>>

Saturday, 2 May 2015

Balloon birthday card

 
I made this card using the partial die cut technique (only running the die half way through the Big Shot), so the balloon floats off up at the top.
 
I used a MISTI stamp positioner (an amazing tool which allows precision stamping and repeat over stamping) to mask and stamp the greeting in different colours, and to overstamp the balloon in Versamark, ready for heat embossing. I also added in the "a" from a stamp in another stamp set, Pictogram Punches, so the sentiment made sense.
 
Here's what I used:
 
 
Built for Free Using: My Stampin Blog


Monday, 13 April 2015

Case-d birthday card


I was short on inspiration last night, so I decided to copy a card that I've seen all over Pinterest recently and absolutely love, by Monika Davis. You can see the original here.
 
I didn't have the products Monika used, so I raided my own stash & came up with a pretty solid recreation, I'd say.
 
The "Happy" stamp is a section from a stamp in Stampin' Up!'s Amazing Birthday set. I started off trying to mask off and repeat stamp it, but that was far too complicated & ink got everywhere. In the end I just stamped the whole stamp multiple times and cut out each "Happy" and glued it to the card. Sometimes the simple ways really are the best.


So have a look round Pinterest and the web in general for designs you like & think how you can adapt them using the stamps and inks you already have.
 
(Remember to give credit where it's due if you do base your design on someone else's work  :) )

Built for Free Using: My Stampin Blog


Friday, 8 August 2014

Banner birthday


Cute birthday card featuring two of this year's In Colors - Tangelo Twist & Blackberry Bliss. I popped the orange Hello up on Dimensionals. 

This pic makes it look big, but it's only ickle - about 4 inches tall? I like it because it's so wee :)

It's my son's birthday today, & I made this for him but then thought better of it. Home made cards from your mum are not the stuff of 14 year olds' dreams, apparently. So I gave him something mass produced & over priced from Paperchase (seriously, £4.95 for an absolutely bog standard card. I no longer feel so guilty about my Stampin' Up! habit).