Showing posts with label Project Life Framelits. Show all posts

Tuesday, 19 January 2016

Vintage Valentine


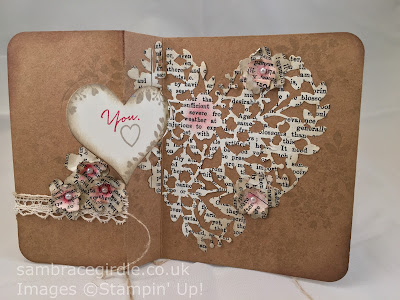
I love shabby chic so I was pleased to see the Bloomin' Hearts Thinlit dies in the Spring/Summer catalogue, as they work really well with this style. I used them here to cut the large text heart background and the small flowers on this Valentine card. What you maybe can't see at first glance is that it's a flip (or swing) card.


The card has a linen thread closure (glued under the crochet trim & flowers) and when opened, the heart flips round to reveal a simple, understated sentiment.

I used the coordinating Bloomin' Love stamp set to stamp flowers and leaves in Sahara Sand ink (2nd impression - stamp off onto scrap paper for the first) randomly on the card and on the edges of the cream heart (cut using the heart from the Treat Bag Thinlits dies, but any medium size heart shape die will do).


The sentiment in red ink is from a stamp set called What I Love (#141276), and it's a Sale-a-Bration set. This means it's free if you spend over £45. To give you an idea how this works, you could buy the Bloomin Love die and stamp bundle (£31.25),  the Venetian Crochet Trim (£6.50), Linen Thread (£4.25) and the Sahara Sand ink pad (£6). This would add up to £48 and you could then choose the What I Love Stamp set as your free Sale-a-Bration item. 


The "Know what I love?" stamp is actually all one line, but even at its widest point my heart die was too narrow to fit it all on. Since the stamp is photopolymer (clear) if you're feeling ruthless you could snip it in two, in the gap between the "what" and "I". I could never bring myself to do such a thing though, so to get it to span 2 lines I masked off "I love?" with washi tape and inked & stamped "Know what". Then I cleaned the stamp and masked off "Know what" and inked up "I love?" and stamped it underneath. 


To make the card I used Kraft cardstock and used the large Framelit from the Project Life Cards and Labels Framlits to cut a 4"x6" card base. I scored along the long length at 2" and at 2 3/4". Then I layed the heart die with the centre point over the first score line, and ran it part waay through a die cutting machine so that just the first and last part of the heart cut. You can see the principle in this card and you should be left with a card base that looks like this - ready to decorate! (The closed size of the card is 4"x4 1/2".)


 Here's what I used:


Built for Free Using: My Stampin Blog

Saturday, 13 June 2015

Clean and simple new baby card

 
I made this sweet new baby card the other day. I used the Project Life framelits to cut the card base and the white front, & repeat stamped "Hello" and the seed head image across the front. I stamped the bottle image in Blushing Bride  ink & raised it on  Dimensionals, Stampin' Up!'s 3d foam pads, with some Daffodil Delight seam binding for a bow.
 
The "Hello" & bottle image are from the Silhouettes and Script stamp set which is a lovely hostess stamp set - you can get your hands on it if you place an order of £150 or more.
 
It made a quick and effective card that's not too bogged down in pink or blue.
 
Built for Free Using: My Stampin Blog


Sunday, 7 June 2015

Simple star card


stampin' Up!

It's easy to get carried away with this stamp set and that die set, but of course you can create great cards with very few supplies.
 
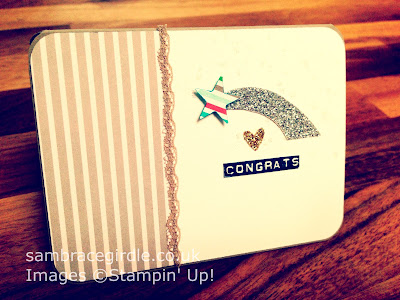
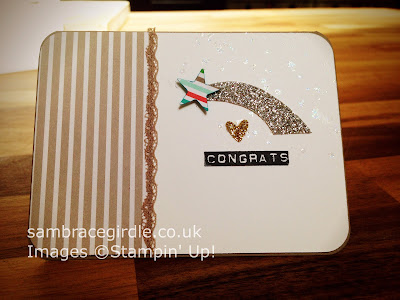
I love using the Project Life label framelits, they instantly create a 3x4" card which is really modern looking. But not everyone has a Big Shot die cutting machine. So for this card I cut my base cardstock to 6x4", scored it down the middle to create a card & then rounded the edges using a corner rounder punch - if you don't have one, place a small coin on your corner & draw round it in pencil, then carefully cut with scissors. Easy - and the coin should ensure you get the same curve on each corner.
 
I cut the white cardstock so it was fractionally smaller than the base card & rounded the edges. the same with the striped paper (which is from the Cherry on Top 6x6" stack).
 
I stamped one of the spatter stamps from the Gorgeous Grunge stamp set with Versamark embossing ink & applied iridescent ice embossing powder & heat embossed it - you can just make it out in this picture. It gives a bit of depth to the finished card.

clean and simple card
 
If you don't have any of those, get a similar effect by dotting dazzling details glitter glue across the card, or a glue pen & some iridescent glitter.
 
I stamped the Congrats stamp from the Silhouettes and Script set (this is a hostess set, available to buy when you place an order for £150 or more. I bought it for these Dymo label type sentiments, which I love), but you can use any stamp set or sentiment. Or use the label maker that this mimics if you have one.
 
I hand cut the silver starburst from glimmer paper (I promise you this is the sparkliest glitter card you will ever see!! Use it sparingly for little accents like this & save your lower quality glitter card for matting & layering etc) and punched the little heart from the Owl Builder punch (although I could have handcut that too). The star is from the Itty bitty punch pack, but again, they are reasonably easy to hand cut too.
 
Finally, I cut the scalloped edge off the dotted lace ribbon & stuck that with a glue pen to cover the join between the patterned paper and white cardstock.
 
A simple, clean and easy card :)
 
You can buy any of these items from my Stampin' up! store 
 
And if you are having a bit of a shop & your order is approaching the £100 mark, think about joining as a demonstrator - you'll get 2 free stamps sets during June, as well as 20% discount on your order, and you don't  have to buy or sell any more if you don't want to. More details here and you can crack on and sign up (listing me as your demonstrator) at http://www.stampinup.net/esuite/home/sambracegirdle/promotions
 
Have fun & I look forward to welcoming you to Stampin' Up! :)
 
 
Built for Free Using: My Stampin Blog


Tuesday, 2 June 2015

New catalogue thanks card

 
Woo hoo! From today you can order from Stampin' Up!'s new annual catalogue.
 
It's packed full of delicious new stuff, and if you spend enough (not difficult) you can qualify for one of the new hostess sets, like this one. It's called Silhouettes & Script and it's got lovely solid images that lend themselves to multicolour stamping and stamp kissing.
 
Anyway, enough hanging around here, go take a look.
 
Well go on!!


Thursday, 19 February 2015

Free Blendabilities during Sale-a-Bration

 
This would be a great card to make for someone celebrating exam success. It uses the large Project Life Framelits die as a base. The smaller die fits almost perfectly over the card front, leaving just a thin pop of colour round the border.
 
I coloured the images using Blendabilities pens. They are alcohol based markers and so the ink blends without leaving harsh lines, unlike felt tip type markers. You get 3 pens in a pack, each one a lighter or darker shade of the same tone, which allows you to get the effects of light and shade you can see in the picture. Why, with only a little practice you'd think I'd been drawing Manga for years!!! (Although my 10 year old dryly assures me that, actually, you would not. Actually.)
 
You can earn packs of Blendabilities FREE during Stampin' Up!'s Sale-a-Bration promotion (til 31 March 2015). Spend £45 (excluding p&p) & choose a pack free.
 
You could make a very similar card to this one by buying the stamp set, 2 packs of Blendabilities, and some A4 whisper white card for £45.35, and choosing your 3rd pack of Blendabilities for free (consult the Sale-a-bration brochure for the product codes for the free blendies, as it's different to the one in the main catalogue)
 
(I'd also recommend buying the Memento ink pad if you don't already have it, as alcohol markers don't work well with all inks. And you'll need an acrylic stamping block to mount the stamps, as they are cling mount)
 
 
Built for Free Using: My Stampin Blog


Saturday, 7 February 2015

Welcome baby card


I love making little cards, & they seem so 'right' for baby cards. 

My current fave card size is 4"x3" & cutting it using the large Project Life Framelit saves a little time & measuring. You can mount the smaller framelit on the front & the base card gives it a delicate edge.

Being able to make a matching envelope quickly & easily using the envelope punch board really finishes it off. I rarely buy envelopes now, so it's paid for itself pretty much right away.


The stamp set featured here is Hello Love*. It's a cartoon style set, and is great for modern cards. It's a Hostess Reward set, which means you can only buy it if your order reaches £150. That might seem a lot, but if you book a party or get together with friends & place a group order it's easily reached.

Qualifying for Hostess Rewards means Stampin' Up! give you £25 back to spend in the catalogue and access to buy the exclusive Hostess Rewards stamp sets, if any take your fancy.

And during Sale-a-Bration your money goes much further. Your £150 spend would also earn you 3 FREE products from the Sale-A-Bration brochure. So now until the end of March is a great time to think about placing larger orders.

And if you're thinking of spending that much, how about joining my team as a Stampin' Up! demonstrator?

*Except for the "Hello Baby" text, which comes from the Teeny Tiny Sentiments set
Built for Free Using: My Stampin Blog


Sunday, 22 June 2014

Moonlight DSP mini book & catalogue giveaway (video)


I made this mini book using the new Moonlight Designer Series paper stack. 


The stamped elements are from the Hello Love hostess stamp set. You qualify to buy this if you or a party you host submits an order for over £150 (oh trust me, it's easily done!). I coloured the wee birdy with the Stampin' Blendabilities.


I used the Project Life Framelits to cut the pages, and the File Tab Edgelits to cut the page dividers. 

You can win this mini book, some bits to complete it and, if you're in the UK, a free copy of the new annual catalogue (worth £5). Leave a comment below & on 1 July 2014 I shall order a small child to draw a winner at random. Oh, the excitement! 


(All elements featured available to buy in the UK from 1 July 2014, except Project Life Framelits which are available now).