Showing posts with label video. Show all posts

Tuesday, 24 November 2015

Folio style December journal (video)


This is my completed December journal! It's full of pockets, pages & photo mounts, ready for documenting next month's festivities 

If you're not familiar with December journals, they're a lovely way to capture memories of a fun & busy time of the year, especially if you have a growing family. Here's a great introduction to them http://aliedwards.com/projects/december-daily although there are many different approaches you can adopt for your journal.

I've made it in a photo folio style, so that I'm not tied to making an entry a day during December or having any kind of coherent narrative running through it. At its simplest it will be a folder for keeping this year's Christmas photos, cards and memorabilia (receipts, present lists etc) together, although I will includee journalling for some days, should my children remove themselves from their computers & we, oh, I don't know, ACTUALLY GO SOMEWHERE AND DO SOMETHING!! Ahem. 

I used 2 ranges from Stampin' Up!'s current Autumn/Winter catalogue; the Home For Christmas DSP (& the cute matching Cozy Christmas stamp set); and the Project Life Hello December 2015 journal cards, accessories & stamps. 


I have taken many, many photos of it - you can wade through them all here - https://flickr.com/photos/123525749@N02/sets/72157660991604470

And here's a video walk though! Do leave a comment or a "like", it would make my day :)


I used a pre-made folio folder by Ranger, and these lovely Stampin' Up! products. You can buy them by clicking on the pictures:

Built for Free Using: My Stampin Blog

Wednesday, 3 June 2015

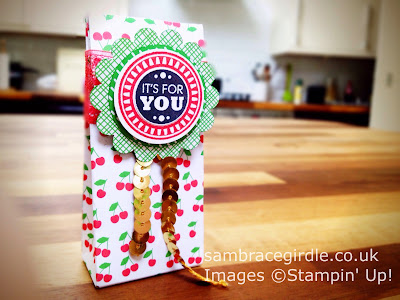
Extra small gift bag with the Gift Bag Punch Board

use 6x6 papers to make extra small gift bags

If you want to use Stampin' Up!'s new Gift Bag Punch Board to make gift bags out of its new 6x6" papers, the instructions on the board would have you believe that you can't. The smallest piece of paper it gives instructions for is 10" wide.

Well I wasn't having that, let me tell you!

The Cherry on Top papers are ideal for diddy gift wrapping, and so after a dash of tweaking, a smidge of fiddling & only minimal swearing I've worked out how to make an extra small bag. It's ideal for gifting a scented tea light, jelly beans, a lolly pop or anything else that measures roughly  1" by 1.5" by 2".

To make it, you pretty much follow the instructions supplied with the board - you just need to have the edge of the paper in a slightly different place at different times.

Here's a video that shows you how:


And here's the order in which you need to punch and score :

  1. Take a piece of paper 6x6".
  2. Line up the left edge of the paper on the start line & punch.
  3. Score horizontal line.
  4. Line up left edge of the paper with the triangle side score line (the sticky out triangle bit) & score on the S vertical line.
  5. Line up the score line created in 4. with the start line & punch.
  6. Line up the score line created in 4. with the triangle side score line & score on the 2nd vertical "side" line (the one before the S line).
  7. Line up the score line created in 6. with the start line & punch.
  8. Position the paper so that the triangle side score line on the board is mid way between the 1st & 2nd vertical score lines & score down to create the gusset.
  9. Line up the 3rd vertical score line with the triangle side score line & score on the S vertical line & horizontally.
  10. Line up the score line created in 9. with the start line & punch.
  11. Line up the score line created in 9. with the triangle side score line & score on the 2nd vertical "side" line.
  12. Line up the score line created in 11. with the start line & punch.
  13. Position the paper so that the triangle side score line on the board is mid way between the 4th & 5th vertical score lines & score down to create the gusset.


Monday, 1 June 2015

Milk carton style box with the gift bag punch board (video)

 
Wheeeeeeee! the new catalogue launches tomorrow and one of Stampin' Up!'s new releases is the Gift Bag Punch Board (#135862), which makes tall gift bags in a variety of sizes. But with minimal tweaking and just a smidge of swearing, you can also create darling little milk carton style boxes with them.
 
This box uses a 6 1/8" x 11 3/4" piece of cardstock (basically, an A4 sheet trimmed along the shorter edge).
 
It makes a box that is roughly 2 3/4 x 2 3/4 x 2 1/2" (excluding the "roof space"). It's slightly smaller than the box created by the Bakers Box Thinlits in the new catalogue (#138279), but the Gift Bag Punch Board is quite a bit cheaper and it does two things, so to my mind it's an easy choice between the two. It's still big enough to pop in a cupcake, or sweets or biscuits etc (not milk though!).
 
Here's a short video on how to make one:
 
 
I used papers from the Cherry On Top 6x6 paper stack (#138443) and the coordinating cardstock (#139013). The "surprise" stamp is from the Amazing Birthday stamp set (#134228).
 
 
The Gift Bag Punch Board and Cherry on Top papers are available to buy from 2 June 2015. You can buy them from my Stampin' Up shop : http://sambracegirdle.stampinup.net or click on Shop now in the side bar >>>

Monday, 18 May 2015

Stampin' Up! new 2015-2016 catalogue - envelope papers (video)


I am thrilled that Stampin' Up! are introducing coordinating envelope papers. As someone who makes pretty much all my own envelopes with the Envelope Punch Board, the papers are easier to work with than designer series paper. The lighter weight means that the score lines fold a little more readily. It's also great to have a bright and jazzy liner, with a practical, plain front side. It means that you can address them & send them through the mail.

Have a look at this video - it shows you how easy it is to use them with Stampin' Up!'s Envelope Punch Board.

As always, if you want to order anything click on the link to my shop in the side bar, or email me if you have any question or would like to know how to get a catalogue.

Sam
x

Sunday, 17 May 2015

New Stampin' Up! catalogue sneak peek (video)


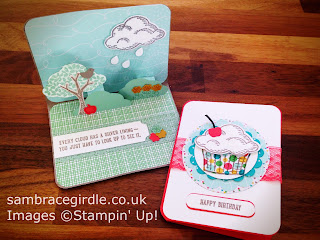
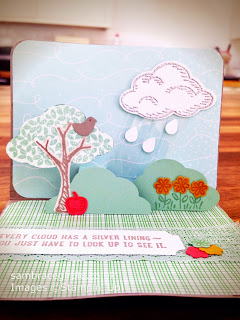
pop up & cupcake card


It's that time of year when we Stampin' Up! demonstrators go all giddy & excitable. The new annual catalogue launch is just around the corner (2 June) & this week we got to pre-order & play with a select few items.

These cards showcase four products:

  • the new 2015-2017 In Colors (a new set of colours Stampin' Up! introduces each year, available for the next 2 years)
  • Cherry on Top 6x6 patterned papers
  • Sprinkles of Life stamp set
  • Tree Builder punch

Card designed by Sam Bracegirdle
£2 from the sale of every Sprinkles of Life stamp set goes to support Stampin' Up!'s chosen charity, the Ronald MacDonald House programme. This provides hospital accommodation for the families of sick children, so they can be together during very difficult times. It's a very worthy cause, & so it's worth buying this stamp set for that alone. It's also very cute & very versatile, with images that range from cupcakes to trees to flowers to clouds, plus sentiments too. You can see just how hard working these items are from these two cards, which use the same products but are totally different.


Sprinkles of Life card designed by Sam Bracegirdle
 
Ooh, I should add, that's the new dotted lace ribbon in one of the new In Colors.
 
Here's a closer look at the cards & the products themselves. You can buy them from my Stampin' Up! shop from 2 June 2015. In the meantime, if you'd like a catalogue, get in touch.
 
Sam x


Sunday, 10 May 2015

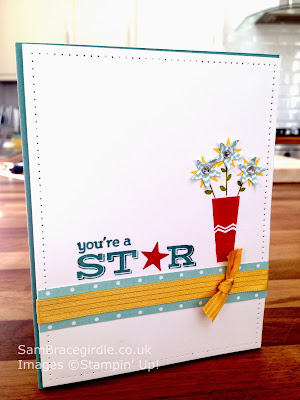
Clean and Simple card using the Pictogram Punches stamp set (& video tutorial)


clean and simple card pictogram punches

This handmade card features Stampin' Up!'s Pictogram Punches stamp set, which is being carried forward into the 2015-16 annual catalogue (out 2 June 2015). Hurray!

Like all good stamp sets, it has a set of coordinating punches - in this case, the Itty Bitty Accents punch pack, which consists of star, heart and flower punches.

Do you like the paper piercing round the edge? It adds a bit of interest and texture to white space. There's a new template for that in the new catalogue too.

When designing this card I used the principle of splitting the card into thirds. Apparently the eye naturally finds items placed where the thirds of the page intersect, pleasing. So the vase is at (roughly!) 2/3 across the card, and the sentiment & ribbon are roughly 2/3 of the way down. 

I made a video showing step by step how I made the card. Apologies for the poor light. I wasn't filming in my usual place, and it turned out darker than I'd anticipated!


If you'd like to purchase anything featured in this video, here's what I used:


Built for Free Using: My Stampin Blog


Thursday, 12 March 2015

No glue chocolate bar box (video)

 
Check out my video tutorial for this box - it's quick and very easy! It wraps a standard sized chocolate bar (Cadbury's Dairy Milk or Green & Blacks). The dimensions of the bar I used are 6"x3", but the box is quite generous & could take something a little larger.
 
You don't need any glue, the folds hold the box together securely. Make it as plain or as fancy as you like. Looking ahead to next term, it would make a great way of dressing up an inexpensive teacher's gift.


Use a piece of paper 8 1/2" x 12". The score lines are as below, and you're going to cut away the shaded areas.


Score along the 12" side at 2 7/8" & 9 1/8" (or flip the card & score again at 2 7/8")
Score along the shorter 8.5" side at 3", 3 3/4", 6 3/4" & 7 1/2"

You want to draw a line at 1/2" from the vertical score line, between the first and second score lines, on each side of the lid. this creates the small flaps that tuck in.

I used the products below to titivate it a bit, but you don't need them to make the basic box (although the score board makes it a doddle!)

Built for Free Using: My Stampin Blog


Saturday, 7 March 2015

Cheerful Critters pop up card (video)


Right. First off, please excuse my grebby nails in this video. I had intended to re paint them beforehand, but, well, frankly I just couldn't be bothered. I'd love to say they don't normally look like that...

Anyway, here's how to make the Cheerful Critters pop up card from earlier in the week. I must admit I've struggled a little with this stamp set. I'm not used to working with cartoonish images & it's been a challenge to work them in in a way which I'm happy with. But I really love this card, & I think they work so well with the So You stamp set.


The ribbon & patterned paper for the dress & pink frame are available for free during Sale-a-bration, for every £45 you spend. There have also been a couple of lovely new additions to the free items so check them out here*. Sale-a-bration only lasts to the end of March, so why not treat yourself now?

*please note the Blendabilities are not currently available to order

Measurements:
Base card 11" x 4 2/8"
Inner  10 6/8" x 4"
Cuts from crease line: 
1st step 1 2/8" from left and right edges, 1 1/5" up
2nd step  1/2" from left & right edges, 1/2" up


Built for Free Using: My Stampin Blog


Friday, 21 November 2014

Quick class card


My card class last night featured the cute and versatile Festival of Trees stamp set & punch. We made 5 very different cards.


I thought I'd share a quick video about my favourite. If you're panicking about not having made your Christmas cards yet, you could bang out multiple copies of this in no time. The base is cut using the Project Life large framelit die and the shapes are all punched out. The only thing that takes any real time is waiting for the glitter glue to dry. Plus, it's a titchy card so it won't use up too much of your precious supplies! The finished card is 3x4" and you can make an envelope for it using the envelope punch board with a 6x6 sheet of paper.

If you're in the Stockport area & fancy crafting with me I'll be running a regular monthly class in the new year. I'll post a class schedule shortly. In the meantime, keep in touch with me via my Facebook page.


Here's what I used!

Friday, 14 November 2014

Project Life Hello December journal - cover (video)


If you're planning on keeping a December journal you need to prepare well in advance. The first couple of weekends in November are ideal - Christmas ads are all over the telly & it feels kind of festive but you really can't dive headlong into Christmas JUST yet, so treat yourself to a little taster, complete with glitter & sequins & snowflakes.

I decorated the covers of my album this week. I used the December Wonder stamp set for the snowflakes (heat embossed with Iridescent Ice embossing powder). The wood Joy plaque & "remember this" are from the Hello December accessories pack, as are the number stickers. Use Crystal Effects to glue the wood plaque & sequins on & they should stay put. 

I've also made a start on my opening page. 


If you watched the video I posted last week you'll recognise the reindeer from the Boden catalogue.  I popped my Project Llife 3x4 Framelit over him & it cut out to the perfect size for the pocket.

I might add to it as I go along or leave it as it is. My usual style is to embellish each page like I do the front cover, but that's so time consuming that I'm going to make an effort to leave it clean & simple this year. 


Here's what I used:

Friday, 7 November 2014

December journal time!


**FREE CLASS**


If  you're interested in keeping a December journal & you live local to me (Stockport, UK), order the elements listed at the bottom, from my Stampin' Up! shop, & I'll give you a free 1-2-1 class on how to approach Project Life and keeping a December journal, plus some handmade journaling cards that will co-ordinate with the Hello December kit. Email me at bracegirdlesam@gmail.com when you place your order.


I've kept a scrapbook type journal of my family's life each December since 2008. It's a daily record of us as a family each December & it's fascinating to see the changes, year on year.

My kids are a bit older now, but I value doing it even more. As they start to grow away from me, and having a photo taken seems more of a chore than the lark it was when they were little, Christmas festivities give me a legitimate reason for taking pics and capturing their last precious moments of childhood...

Goodness. How very mawkish! But if you've got teenagers I'm sure you know what I mean.

Last year I made a very elaborate December album. So elaborate, in fact, that I  used up all my mojo making it & by day 17 I got fed up & stopped filling it in. 

I learned a valuable lesson, and this year I've pared things right down. I'm going to use the Project Life method to keep my Christmas journal. I'm using the Hello December cards, accessory pack and PL album from Stampin' Up! and I'll complete it with photos and other bits and pieces from my stash.  I'm confident it will let me to balance creativity with the inevitable demands on my time that December brings!

Here's a video overview of the kit, plus you can have a look at some of the Christmas journals I've done  before.


To qualify for my free class, please purchase the following (4 items)